Here are some thoughts on paint.....
Brands:
I've painted my whole house, every room, from one time to another.(and my old house) I've used Behr, Valspar, BM, SW, and Glidden.
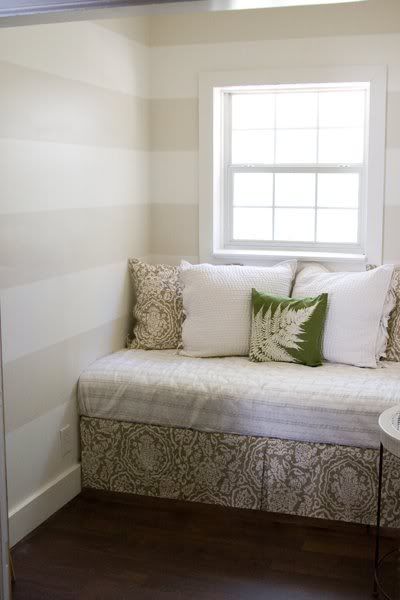
Behr (Home Depot): Thin, thin, thin. If you love a color, get it in BM or SW. I used the premium paint for my spare room (striped one) and it was just like using plain BM.
Valspar (Lowes): thin, thin, thin. I had to do FOUR coats of white to cover a pale blue in my bathroom. FOUR coats. I could understand if it had been a dark color I was trying to cover, but it was baby blue and I STILL see pieces of blue come through in places when I'm in my bathroom. Someday, maybe this summer, I'll do another coat of higher quality white paint. Thank GOD it was on a gift card!
Sherwin WilliamsW: I like Sherwin Williams, BUT it was actually a little too thick for me....
Glidden: A little thicker than Behr and I liked the way it covered in two coats. I did my bedroom in Glidden.
Benjamin Moore: Ahhhh, love it. I did my living room in BM. LOVED it. It was smooth, the roller and cutting brush strokes blended nicely and two coats covered evenly without looking thin or too thick.
My winner: BENJAMIN MOORE!
And, I don't really love the whole "primer built into the paint" trend that's going down these days. You can't beat a good caot of Kilz primer (oil based for wood projects and latex for regular wall work) followed by two even coats of paint. I hope that helps!
Finishes:
For the most part, paint finishes are dependent on the space you plan to paint! I tend to stick with eggshell or satin finishes for bedrooms, living rooms, and dining rooms. For the kitchen and bathroom, you want to stick to a semi-gloss or gloss finish so the wall is washable.
Showing posts with label paint. Show all posts
Tuesday, January 1, 2013
Sunday, October 9, 2011
Shutters are up and it's done-zo!
Finally, my shutters are up and the exterior of the house is done. From 2 years ago to now!
New paint (Brown Tee Pee by Behr; New shutters (architecturaldepot.com); new lighting from Lowes;
Before: (2 years ago)
New paint (Brown Tee Pee by Behr; New shutters (architecturaldepot.com); new lighting from Lowes;
Before: (2 years ago)
Now:
My fall yard plan is to trim a lot of of the shrubs and two large trees in front of the house and that's that!
Monday, August 15, 2011
Ta-Da, they are done!
Whewwwwwwww! I feel like I just went down the hill on a rollercoaster!!!
Just over one week later, the stripes are done! This project didn't take me one solid week, but I gave myself plenty of time to do it because I just knew it would be extremely tedious. Actually, Wed-Sat this past week were gorgeous summer days here and I didn't pick up my paintbrush once. Ultimately, I worked Sun, Mon, Tues, Sun, Mon on it.
I was excited to get the room back in working order today after finishing the second coat on the last wall, so here is a pic I captured just a short while ago. The accessorizing is basic, nothing too overblown or with anything new. From the start, I intended to keep the existing white bedding and bubble shades (both from Target), but I switched out the curtain rods (to ones I already owned, but never put up in this house, so no cost there).
Again, a look at the before w/ the seller's blue walls:
And, NOW!

Details:
Colors: Behr's Chocolate Froth (lighter color) & Wheat Bread (darker color)
Supply: Used about 2/3 of one gallon of Chocolate Froth (2 coats); Almost 2 full quarts of Wheat Bread (2 coats); 2.5 rolls of 1-inch Frog tape
Thoughts:
What did I learn from this project?
Just over one week later, the stripes are done! This project didn't take me one solid week, but I gave myself plenty of time to do it because I just knew it would be extremely tedious. Actually, Wed-Sat this past week were gorgeous summer days here and I didn't pick up my paintbrush once. Ultimately, I worked Sun, Mon, Tues, Sun, Mon on it.
I was excited to get the room back in working order today after finishing the second coat on the last wall, so here is a pic I captured just a short while ago. The accessorizing is basic, nothing too overblown or with anything new. From the start, I intended to keep the existing white bedding and bubble shades (both from Target), but I switched out the curtain rods (to ones I already owned, but never put up in this house, so no cost there).
Again, a look at the before w/ the seller's blue walls:
And, NOW!

Details:
Colors: Behr's Chocolate Froth (lighter color) & Wheat Bread (darker color)
Supply: Used about 2/3 of one gallon of Chocolate Froth (2 coats); Almost 2 full quarts of Wheat Bread (2 coats); 2.5 rolls of 1-inch Frog tape
Thoughts:
What did I learn from this project?
- My ceiling isn't quite level. This was challenging for measuring the first set of stripes from the top of the wall. The eye wants to see them the same distance from the top of the ceiling the whole way around this room AND intersect window frames from the same point on each side--uh, tough to do.
- Frog tape rocks to make clean tape lines. It's very tough, though, to maneuver in high humidity and loses its adhesiveness quickly if you mess with it a lot, causing it to buckle and peel a little. So, you've got to press the tape down tightly just before rolling the paint on.
- Patience and taking breaks made this possible. My only goal was to finish it before I went back to school on August 23. Accomplished! This is not a weekend job--at least not for me!
- I don't know if I would do this again.
- I'd have to have a pretty darned good reason to EVER paint this room again!
- I love the final product---a lot!!!
- I really love Home Depot, but I strongly dislike Behr paint. For the base color, I used their new "Ultra" paint, which boasts about its built-in primer. This paint did not offer any higher quality coverage than paint I had used before. In fact, basic Benjamin Moore paint has better coverage than this paint. Then, when I painted the darker stripes, I used the regular Behr paint. It was very thin. Two coats were a must. I had a store credit for Home Depot and that is mainly why I used Behr paint. In the future, I'll definitely go back to Benjamin Moore and save my store credit for other things.
Tuesday, August 9, 2011
Progress!
Here's an update.....Well, after peeling the tape on the test wall, I deemed it a success!
I turned the corner...literally! I've just started taping on the other side of the window and I ran out a tape and am almost out of the "Wheat Bread" stripe color (I clearly underestimated my supply demands--I only bought one quart of the wheat bread and I probably had enough to do the first coat of the next wall, but not 2 coats on the rest of the walls.) PS, the lighting is bad because I used my iPhone for these pics and not my regular camera w/ a flash.
To the other side of the window! Using the lower stripe line to keep both sides of the window consistent. Fingers crossed!
Step by step.....day by day! I'll get there! I have 2 weeks until school starts back up and this room will be done!
I turned the corner...literally! I've just started taping on the other side of the window and I ran out a tape and am almost out of the "Wheat Bread" stripe color (I clearly underestimated my supply demands--I only bought one quart of the wheat bread and I probably had enough to do the first coat of the next wall, but not 2 coats on the rest of the walls.) PS, the lighting is bad because I used my iPhone for these pics and not my regular camera w/ a flash.
To the other side of the window! Using the lower stripe line to keep both sides of the window consistent. Fingers crossed!
Step by step.....day by day! I'll get there! I have 2 weeks until school starts back up and this room will be done!
Monday, August 8, 2011
This is what I've been up to...
....and I'm super exhausted already and it's not even close to being completed yet!
I have always been drawn to striped walls like these:
Now, all I needed was tape, paint, and patience. The kicker in never embarking on this process was the patience factor...
Last week, my inspiration was sparked by a friend's room that she just completed featuring gorgeous striped walls. She made it look so easy and gorgeous, I was set on biting the bullet and copying her look!
I decided the guest bedroom was the place to try this experiment. Here is a recent photo of the guest bedroom with its original seller's blue walls:
Here is where I am at so far...I painted the walls "Chocolate Froth" by Behr (2 coats):
Then, I taped the wall (ONE wall so far) ....I marked the wall in 8 inch intervals 4x across the width of the wall. Then, tried to line of the tape so it was level. THIS was the most frustrating part of the project (as I expected it would be and ultimately, the reason why I've never tried this project before!) I marked with a random piece of tape the areas that would be painted so I would remember to put the tape either below or above the 8 inch mark points. The main problem is that your eye starts to play optical illusions with the tape lines and they start to move and....needless to say, I kept obsessing with my level and measuring tape (and a few curse words here and there!)
Then, I rolled the color "Wheat Bread" (the next color down on the Behr paint chip). The frog tape kept peeling up because it's humid out today, so I had to press it down firmly again just before rolling. I used a brush to do the sides around the edges. The first coat is drying as we speak and I will apply the second coat later tonight (as I have to leave soon to go to a meeting at work and then teach a spin class!).
Hopefully, tonight after I do the second coat & peel the tape, I will love it so much, the remaining walls will be taped and follow in suit....but, I can't make any guarantees! That is why I only did one wall right now. If I hate it and deem myself "unfit to tape stripes properly" I will just paint over the wall again in Chocolate Froth...
We shall see what the future brings!
I have always been drawn to striped walls like these:
Now, all I needed was tape, paint, and patience. The kicker in never embarking on this process was the patience factor...
Last week, my inspiration was sparked by a friend's room that she just completed featuring gorgeous striped walls. She made it look so easy and gorgeous, I was set on biting the bullet and copying her look!
I decided the guest bedroom was the place to try this experiment. Here is a recent photo of the guest bedroom with its original seller's blue walls:
Here is where I am at so far...I painted the walls "Chocolate Froth" by Behr (2 coats):
Then, I taped the wall (ONE wall so far) ....I marked the wall in 8 inch intervals 4x across the width of the wall. Then, tried to line of the tape so it was level. THIS was the most frustrating part of the project (as I expected it would be and ultimately, the reason why I've never tried this project before!) I marked with a random piece of tape the areas that would be painted so I would remember to put the tape either below or above the 8 inch mark points. The main problem is that your eye starts to play optical illusions with the tape lines and they start to move and....needless to say, I kept obsessing with my level and measuring tape (and a few curse words here and there!)
Then, I rolled the color "Wheat Bread" (the next color down on the Behr paint chip). The frog tape kept peeling up because it's humid out today, so I had to press it down firmly again just before rolling. I used a brush to do the sides around the edges. The first coat is drying as we speak and I will apply the second coat later tonight (as I have to leave soon to go to a meeting at work and then teach a spin class!).
Hopefully, tonight after I do the second coat & peel the tape, I will love it so much, the remaining walls will be taped and follow in suit....but, I can't make any guarantees! That is why I only did one wall right now. If I hate it and deem myself "unfit to tape stripes properly" I will just paint over the wall again in Chocolate Froth...
We shall see what the future brings!
Tuesday, August 2, 2011
House paint is done, just waiting on those shutters....
Hey everybody! The painters finished my house this week and I'm just waiting on my new black shutters to arrive from architecturaldepot.com!
To remind you, the BEFORE (and this is w/ the old rusty colored roof)
And now, the AFTER with a new roof with architectural shingles in "Driftwood" and exterior paint in "Brown Teepee" by Behr. Black shutters, a new mailbox, and lighting to come soon--but I wanted to post an update now! Let's not talk about how i opted for no impatiens this year and my flower beds lack major color...ugh. The zinnias are doing great, but they are hard to see from far away!
Here's a before and after of the back of the house:
Before:
After:
To remind you, the BEFORE (and this is w/ the old rusty colored roof)
And now, the AFTER with a new roof with architectural shingles in "Driftwood" and exterior paint in "Brown Teepee" by Behr. Black shutters, a new mailbox, and lighting to come soon--but I wanted to post an update now! Let's not talk about how i opted for no impatiens this year and my flower beds lack major color...ugh. The zinnias are doing great, but they are hard to see from far away!
Here's a before and after of the back of the house:
Before:
After:
Hmmm, next I need to do something about those unsightly (and seemingly functionless) cinder blocks under the deck. I'm thinking a wood lattice panel.
Saturday, July 30, 2011
Wednesday, July 29, 2009
Not Knotty Pine!?!
No, not for me....
It was a tough decision to redo the knotty pine walls in my 3rd bedroom of my new home. It's the only room with paneling and it's the smallest...go figure! I want the room to be my home office/creative zone....I need a place to grade papers and do some lesson planning as well as make the many crafty things I enjoy!
So, lots of people came into my house saying how much they loved the pine, "It's like a ski lodge!" they'd say......or they'd say "Do you know how expensive that was when they put that up!?" or "Wood is sacred, you can't paint that!" But, hey, it's my house and I was totally not feeling the wood!
The process began.....let me preface this with that I didn't use regulation goggles....my sunglasses had to do since i forgot to buy goggles. Also, I've NEVER ever done a paint effect before. This was my first try and it was pretty easy and it was actually the easiest step of the process! The priming was the hardest because the primer is thick and was tough to get into the grooves between each panel.
1. Sand w/ rotary sander. PS, wear goggles & mask......so much dust. I didn't wear a mask at first and I was suffocating and blinding myself (saw dust stuck in my eyelashes!!)


2. CLEAN up all of the saw dust!!!
3. Prime the walls with an oil-based primer. The wood soaks it up better than latex. It stinks. You will be high. Wear a mask here as well! Keep the room ventilated as best as possible. I did 2 coats of primer. The toughest part about priming was the fact that I had to use brush to get into the tongue & groove joints between each panel. AYE!!! I also primed the baseboard, crown moulding, door frames and doors.
4. Then, I did a coat of Sherwin Williams "Medici Ivory" which was a real classic ivory that reminded me of French Vanilla ice cream as I was painting. I only needed one coat.
5. Then, I mixed a quart of Glidden's "Soft Suede" paint with a half a gallon of clean glaze. (in a separate mixing bucket)

6. I used a wispy brush & very little paint to apply burts of the paint/glaze mix. Then, I brushed until the brush was dry and then wiped the color around in inconsistent locations....thicker coverage in others, more bare & translucent in others. This went fairly quick---I was done with this step in about 20 mins!

**This is what it looked like after I had finished the paint effect, but still had to do the moldings..


7. Paint the trim other white moldings w/ 2 coats of semi-gloss white. Also, I will be painting all of my interior doors white eventually, but this room is getting the ball rolling! I painted the closet door white on both sides and left the hallway door wood on the hall side for now--so I don't have one white door in the hall for a month until I get the courage to start that project.....I'm all set w/ painting right now! Do you see how my doggy is so sad I'm in here painting all day!!

8. Done! (I have to have someone come over 7 help me remount the doors and then move a furniture into the room, so until then, the room is "done" but not decorated.)
Before & After!!


It was a tough decision to redo the knotty pine walls in my 3rd bedroom of my new home. It's the only room with paneling and it's the smallest...go figure! I want the room to be my home office/creative zone....I need a place to grade papers and do some lesson planning as well as make the many crafty things I enjoy!
So, lots of people came into my house saying how much they loved the pine, "It's like a ski lodge!" they'd say......or they'd say "Do you know how expensive that was when they put that up!?" or "Wood is sacred, you can't paint that!" But, hey, it's my house and I was totally not feeling the wood!
The process began.....let me preface this with that I didn't use regulation goggles....my sunglasses had to do since i forgot to buy goggles. Also, I've NEVER ever done a paint effect before. This was my first try and it was pretty easy and it was actually the easiest step of the process! The priming was the hardest because the primer is thick and was tough to get into the grooves between each panel.
1. Sand w/ rotary sander. PS, wear goggles & mask......so much dust. I didn't wear a mask at first and I was suffocating and blinding myself (saw dust stuck in my eyelashes!!)


2. CLEAN up all of the saw dust!!!
3. Prime the walls with an oil-based primer. The wood soaks it up better than latex. It stinks. You will be high. Wear a mask here as well! Keep the room ventilated as best as possible. I did 2 coats of primer. The toughest part about priming was the fact that I had to use brush to get into the tongue & groove joints between each panel. AYE!!! I also primed the baseboard, crown moulding, door frames and doors.
4. Then, I did a coat of Sherwin Williams "Medici Ivory" which was a real classic ivory that reminded me of French Vanilla ice cream as I was painting. I only needed one coat.
5. Then, I mixed a quart of Glidden's "Soft Suede" paint with a half a gallon of clean glaze. (in a separate mixing bucket)

6. I used a wispy brush & very little paint to apply burts of the paint/glaze mix. Then, I brushed until the brush was dry and then wiped the color around in inconsistent locations....thicker coverage in others, more bare & translucent in others. This went fairly quick---I was done with this step in about 20 mins!

**This is what it looked like after I had finished the paint effect, but still had to do the moldings..


7. Paint the trim other white moldings w/ 2 coats of semi-gloss white. Also, I will be painting all of my interior doors white eventually, but this room is getting the ball rolling! I painted the closet door white on both sides and left the hallway door wood on the hall side for now--so I don't have one white door in the hall for a month until I get the courage to start that project.....I'm all set w/ painting right now! Do you see how my doggy is so sad I'm in here painting all day!!

8. Done! (I have to have someone come over 7 help me remount the doors and then move a furniture into the room, so until then, the room is "done" but not decorated.)
Before & After!!


Subscribe to:
Posts (Atom)